Windows 11
written by Sue Kayton
www.suekayton.com
updated September 2023
DO YOU NEED WINDOWS 11?
Windows 11 has been officially released. If your existing computer is
working well, there's no need to install Windows 11 on it. But if you are
buying a new computer, you should buy it with Windows 11 pre-installed. The
hardware requirements to run Windows 11 mean that it will not run on computers
that are more than about 5 years old. Most new PCs will come with
Windows 11 pre-installed, unless you specially request Windows 10 or buy a
discontinued model.
The vast majority of changes in Windows 11 are cosmetic - such as rounded
corners on the windows and rearranged layouts, and do not affect usability.
Some users may find it difficult to adjust to the new layouts.
Starting in the year 2023, some software developers will start publishing
software that will
only run under Windows 11. I have tested some truly ancient software and
so far all the programs that run under Windows 10 will still run under Windows
11. Please
email me if you find software that works on 10 but doesn't work on 11.
Here's a 14-minute video
showing some of the differences (mostly cosmetic) between the Windows 10 and
Windows 11.
If you already have Windows 11 installed, Tom's Hardware has an
excellent write-up of how to work around some of the annoying features (or
features that are missing) from Windows 11.
REQUIREMENTS TO INSTALL WINDOWS 11
There are
official requirements about what computers will support Windows 11.
However, it will run on a much older machine than what the official list requires. I have successfully installed
Windows 11 on a ten-year-old laptop. Windows 11
will only run on a computer with 64-bit architecture with the hard drive
initialized in UEFI mode. While the official requirements are for Secure Boot
enabled, and TPM 2.0 ( or newer)
activated in the BIOS, you can install it without these two
features. For the computer to run fast, you'll want a solid state drive (SSD)
instead of a spinning hard drive. Various internet sites claim that you can
tweak stuff to get Windows 11 to upgrade on a computer without UEFI (Unified
Extensible Firmware)or TPM (Trusted Platform Module), but so far none of those
methods I have found work on the actual release version of Windows 11.
Most computers with an i5 or newer processor meet the system requirements for
Windows 11, even if the computer says the processor isn't supported.
Not sure if your computer uses UEFI or legacy
boot or has Secure Boot turned on? You
can run msinfo32.exe (built into Windows, run from elevated command prompt) or
use the Windows PC Health Check tool. Either tool will report what your
computer is currently using. Run TPM.exe to determine if TPM is installed
and activated. If not, it is possible that these features are
available, but are turned off in the BIOS. You can safely turn on TPM
and activate it without disturbing an existing Windows installation - the
computer will still boot. If you are using UEFI and secure boot is
disabled, you can safely enable secure boot without disturbing an existing
Windows installation. You can access the BIOS to check if these three
features are available. Each manufacturer has a different method for
accessing the BIOS. On a Dell, it's always F2. Newer Lenovos use the
Enter key, and newer HPs use the Esc key. Most non-brand-name computers
will use the Del key. You have to hit these keys immediately after you
turn on the computer - very early and often
- to get into the BIOS. If your computer is using
UEFI, you can also access the UEFI setup program from Windows, by holding down the
shift key while restarting the computer, then select Troubleshooting / Advanced / UEFI settings.
Windows uses two different methods for initializing a hard drive.
MBR (Master Boot Record) partitioning is compatible only with Legacy boot,
GPT (General Partition Table) partitioning is compatible only with UEFI boot.
If your computer is booting in Legacy mode, that means that your boot drive is
initialized and partitioned using MBR. If you are booting in UEFI mode, that means that
your boot drive is initialized and partitioned using GPT. If you change
boot methods (from Legacy to UEFI or the reverse), your hard drive will no
longer boot, unless you change the partitioning of the hard drive to match the
new boot method. In order to install Windows 11, your hard drive must be
partitioned GPT and you must use the UEFI boot method.
If you are currently using Legacy boot, and you want to change to UEFI boot
so you can install Windows 11,
then you will need to either (1) jettison your existing Windows installation,
change to UEFI/Secure Boot, install a clean copy of Windows, and then
install your programs and copy your data onto it, or (2) image your existing Windows
installation onto an external disk, change to UEFI/Secure boot and restore the
image, or (3) use a partitioning tool like
Easeus Partition Manager to change
your existing disk from MBR to GPT, then switch to UEFI/Secure boot. CAUTION -
if you choose this method (changing the drive from MBR to GPT), make sure to back
everything up in case this method fails and you cannot boot from the drive.
Easeus has a free trial version which does not include the capability to change
from MBR to GPT - that capability is only available in the paid version.
CLEAN COPY OR UPGRADE INSTALL?
Installing a clean copy of Windows 11 takes less than 10 minutes on most
computers with a solid state drive (SSD). Upgrading from Windows 10 to
Windows 11 takes more than an hour on most computers, and does not always succeed.
Installing a clean copy also has the advantage of a much speedier computer when
you are done, because you won't have years of clutter and tons of unused
programs clogging up the machine, and will get rid of any viruses that might
have crept into your computer. If you do a clean install of Windows 11, it
will take up about 38 GB of space, so you could easily install it on a drive as
small as 60 GB.
You can
download the Windows 11 installer directly from Microsoft.
A clean install will erase all information stored in your computer, so make
sure to back up your files and make sure you have a current, complete list of
all of your usernames, passwords, and favorites / bookmarks. If you use
Google Chrome as your default browser and you have a Google (or Gmail) account,
then you likely will have turned on the sync feature which will have copied your
bookmarks to the cloud (and your passwords if you asked Chrome to save them).
Once you log back in to your Google (or Gmail) account after installing Windows
11, this synced information will automatically be retrieved. Of course,
you will need to know your Google username and password to log in to Google (or
Gmail).
If you want to do a clean install, make a list of all the software you will
need to re-install, and make sure you have the installation files, serial
numbers, keys, and/or login information to your online accounts to download and
install the software. You can download the latest version of many freeware
programs from www.ninite.com.
If you are doing a clean install of Windows 11, you will need a Windows
installation key from Windows 7, 8 or 10. On a
computer that came pre-installed with Windows 8 or 10, the Windows installation
key is stored in the computer's BIOS/UEFI and the computer will likely have
a sticker like one of the four below, at the left. If this is the case,
the computer will automatically get the installation key, and will know if you
have the Home or Pro version. You can retrieve the stored key by using
this command from an elevated DOS prompt. wmic path
softwarelicensingservice get OA3xOriginalProductKey

On an older computer, there's
usually a sticker with the installation key like the one above, at the right.
The sticker will specify whether the computer is running the Home or Pro version
of Windows. You will need the key on this sticker (and the information
Home/Pro) to do a clean install. If there is no such sticker, or if you
cannot read the installation key and you are doing a clean
install, run the built-in program msinfo32.exe to see if you are currently
running Home or Pro before starting the installation. If there's no
sticker and the computer did not come pre-installed with Windows 8 or 10, you
can retrieve the Windows key using
Belarc Advisor.
If you think your computer should be able to run Windows 11, but the
installation program claims it doesn't meet the requirements, try installing these two registry tweaks,
which will definitely fix the problem if it's the processor, and might fix the
problem if it's for some other reason.
MICROSOFT LOGIN v. LOCAL LOGIN
Installing a clean copy of Windows 11 Home requires you to connect to the
internet and set up (or log into) a Microsoft account, including creating a PIN
login shortcut for your Microsoft account. If you create a PIN, write it
down on your list of usernames and passwords since the computer will ask for it
each time you log in. Once Windows 11
Home is installed and the computer
is logged in to your Microsoft account, you can change from the Microsoft boot to a local
boot. If you are installing a clean copy of Windows 11 Pro, do NOT connect an ethernet cable during
installation and when it asks you to connect to the internet, click on "I don't
have internet" and then on the next screen click on "Continue with limited
setup."  Not
connecting to the internet when installing Windows 11 Pro allows you to skip the
step of creating a Microsoft account and go directly to a local login.
Once the local login is created, then you connect the computer to the internet.
You can
switch from a Microsoft login to a local login at any time, with either the
Home or Pro versions of Windows 11. Using a local login instead of a Microsoft login makes troubleshooting much
easier and protects your privacy. If you are installing Windows 11 Home or
Windows 10 Home, the computer will require you to set up (or log into) a
Microsoft account unless you follow
these
instructions.
ENABLING SAFE MODE
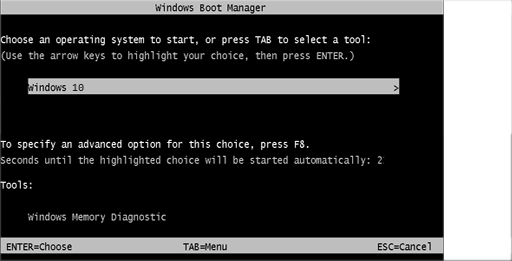
Make sure to enable Safe Mode in case you ever have trouble starting the
computer. Under Windows 11, by default you
cannot use F8 during boot to enter safe mode. To enable easy and reliable
access to safe mode,
open an elevated command prompt and type in the following three lines, one
at a time.
bcdedit /set {bootmgr} displaybootmenu yes
bcdedit /timeout 3
bcdedit /set {default} bootmenupolicy legacy
MAJOR FUNCTIONAL CHANGES FROM WINDOWS 10
Most of the changes are cosmetic. But here
are some of the functional changes that will probably affect you.
1) The Start button has moved to the bottom center. Here are
instructions for how to move it back to the left corner. If you are
looking for the list of apps, click on Start, then look at the upper right of
the window that popped up, where it says All Apps. Do you want the old Windows 10 style start menu
back? The simple ShowClassicMode registry hack no longer works as of
September 2021. Instead,
Tom's Hardware discusses alternate ways to get it back.
Personally, I use
Stardock Start11
which costs only $4.99, and also sets the background of the start menu to white
instead of default. Stardock allows you to have your start menu look like
the Windows 7 style or the Windows 10 style and allows many types of
customization.
2) To access the Windows 7-style list of programs, go to c:\ProgramData\Microsoft\Windows\Start
Menu or c:\Users\yourusename\AppData\Roaming\Microsoft\Windows\Start menu.
You can make a shortcut to this location on your desktop. To access the Windows 10-style list of applications, click on the Start button,
then at upper right select All apps.
3) When you right-click on some files or icons, the list of options no longer
includes the words Copy, Paste, Cut, Rename, Delete. Instead, there are little icons
at the bottom of the right-click menu that perform these functions. To
access the missing right-click choices, click on "Show more options."
If you want the traditional right-click menu back,
follow these instructions or import
this registry key. If
you want to download the key, but your software blocks it, download
this zipfile, unzip it,
and import the resulting .reg file into your registry.
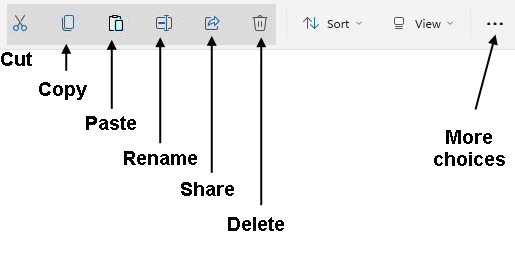
4) In Windows Explorer, the File / Edit / View menu has been replaced
with a bunch of little icons representing cut, copy, pasty, rename, send to, and
delete. Here's a graphic showing what they represent. You can
restore the old menu by
following these instructions or import
this registry key
or this alternate registry
key.
If you want to download the key, but your software blocks it, download
this zipfile, unzip it, and
import the resulting .reg file into your registry.

5) To shut down the computer, the location of the Shut Down button has
moved. When you click on the Start button, look at the bottom right - you
can right-click on the Power button to select Shut Down, Restart or Log Out.
Or download this handy ShutDown icon
and put it on your desktop.
6) Windows 11 can run Android apps. Read more about this feature
here.
7) It's harder to get to the jump lists of recently-used documents
accessed from a program. Add the program to the taskbar, and then right-click on
the taskbar icon to see the jump list of files associated with it.
8) The list of optional Windows updates is much harder to find and
install. Here are
instructions.
9) In File Explorer, the option to show hidden files and show extensions
is now buried under Show More at the bottom.
10) To view the list of available WiFi networks, when you click on the WiFi
icon in the system tray (at bottom right), you do not see this list.
Instead, after clicking on the little glove symbol in the system tray, look at
the rectangle in the upper right corner of the pop-up menu. Click on the
right-arrow next to the word "Available" to view and select one of the
available networks there. Or go into Settings / Network and choose WiFi
from the left column. Or download
this handy icon and save it on your desktop.
11) Software that is older than about 7 years most likely will not work
under Windows 11. Software that is less than 4 years old will almost
certainly work on Windows 11. Check before you upgrade. You may need
to get a newer version of the software.
Tom's Hardware has an
excellent write-up of how to work around some of the annoying features (or
features that are missing) from Windows 11.
***********************************************************
Do you have more operational changes to report that should be added to this
list? Email Sue Kayton to report
them.


 Not
connecting to the internet when installing Windows 11 Pro allows you to skip the
step of creating a Microsoft account and go directly to a local login.
Once the local login is created, then you connect the computer to the internet.
You can
